
Introduction to Terraform
TL;DR - Terraform describes your infrastructure as code.
Understanding
Terraform is a tool for building, changing, and versioning infrastructure safely and efficiently” — Terraform intro, Hashicorp
Terraform allows you to declare what the end-state of your infrastructure is supposed to look like, and TF figures out the rest. The term Infrastructure as code is used a lot and it means exactly that: you describe your infrastructure as code, and the dev workflow should be the same as when you write application code. On changes to your code, you run Terraform commands to format, validate and plan your infrastructure changes. You can then choose to apply your changes, and should you want it, you can destroy the resources you just added. This can come in handy for temporary example projects or cloud dev-environments.
Simply speaking, Terraform is a CLI tool wrapping the ‘administrator APIs’ of cloud platform providers. E.g. Terraform Google Registry uses the Googles several REST APIs under the hood.
We’ll be looking into GCP for this particular blogpost.
Configuring
When explaining Terraform, I mentioned that it allows you to declare the end-state of your infrastructure for cloud providers. The configuration files are declarative and use a language called HCL - Hashicorp Configuration Language. It’s like a mutated JSON / YAML beast with a lot of extras on top.
All of your infrastructure state needs to be stored somehow, in order for TF to check for differences between the current configuration and any changes made. This state is referred to as the backend. For testing purposes as a solo developer, you could have the state on your local machine (which is the default anyway). But for collaboration, consider setting up a shared backend. More on that in collaborating.
Let’s look at how we structured files and folders in a project.
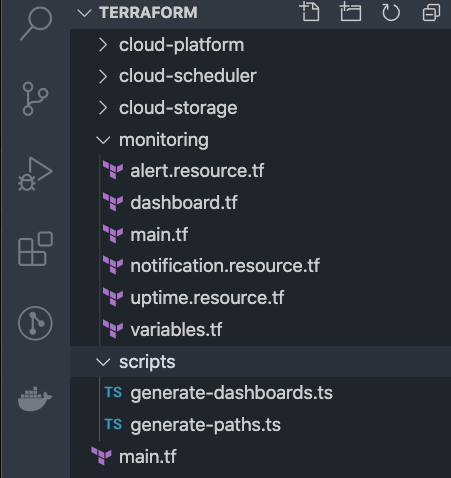
main.tf is the entrypoint to our configuration. This file contains the meta of our infrastructure, such as which version of Terraform we’re using, and what cloud provider libraries we’re using. A provider is e.g. Amazon, GCP, or Azure. A module is a logical grouping of resources as defined by the provider. A resource is like a provider feature, e.g. Uptime checks is a feature within the Monitoring module.
For each module a folder is created, and that folder contains all the resources and data for that module. Each module will also have it's main.tf file, which specifies what configuration is needed and returned when the module runs.
Now let’s look into some configuration files.
main.tf
The Terraform block allows us to specify which version of TF we need. Backend is where the Terraform state is stored, it can be local or remote. We’ll get back to this later.
locals is a block of locally defined variables, in this case we define a credentials_file variable used for GCP credentials. The file-function lets us load a file and use the file contents in our config.
The provider block specifies that we’re using GCP. It requires a project id and credentials. The version specifies what version of the provider we’re using.
We also list the modules we've defined in folders, with a source path, and a variable. Terraform will look for a main.tf-file in the provided directory. Note the use of variables. We use variables to enable multiple environments and decreasing risk of committing project secrets. The variables can be injected in a multitude of ways; they can e.g. be stored in files, or added as CI/CD build secrets.
The ‘split’ function converts a string into a list using the provided separator. Here we used it to convert a string of comma-separated email addresses into a list.
Input variables can be defined as well, with support for type checking and default values.
Case Study: Microservice Monitoring
I want to highlight a few powerful features of Terraform by first explaining what we're after. For our GCP project we want to
- add http uptime checks for several microservices
- add notification channels should something go down
- create alert policies for our uptime checks, alerting our newly created notification channels
Let’s start from the top. This is not complete configuration though, a lot has been omitted for brevity. All the files in any given module will be combined by Terraform in the proper order when running commands. TF figures out any dependencies so that operations are performed in the required order.
In the first block, we are adding http uptime checks, and we have several microservices to check. Instead of repeating the block for each microservice, a variable paths is used here. The variable type is map, with objects as values for each key, plain json actually. We access the values with dot-notation e.g. each.value.name, and the resource will be created for each path provided, as indicated by the for_each keyword. We then set values such as display name and hostname.
In the next resource block, we’re adding notification channels, based on the notification recipients string I mentioned earlier. For the display name, we combine functions trimspace and split for each email, and access the first value of the result.
The third block is where Terraform really shines. We’re creating alert policies for the uptime checks from earlier, and we’ll also use the notification channels previously created. So we iterate the same paths again and reference previous resources with the ${..}-syntax in the display_name prop. And then we also add the recently created notification channels for each alert. This time we use the for..in syntax, this is a way for us to extract an output value into our array. The syntax is [for <ITEM> in <LIST> : <OUTPUT>].
Tinkering
So how does a developer get started with this? Install the Terraform CLI and start running Terraform commands in the terminal!
The workflow for a developer is basically running these commands until you have your desired infrastructure, or your demo-project has served its purpose.
Collaborating
For collaborating with infrastructure as code, we have the same workflow but with some modifications.
We don’t want your backend state to differ from a colleagues backend state, so it should be remote - just like source control. The backend can be setup as a remote backend in e.g. Google Cloud Storage with strict rules on access/modify and with versioning enabled. This prevents developers from creating conflicts and messing with the projects infrastructure.
The commands shouldn’t run on a developers machine, rather they should be run from a CI/CD server. In our case, we used Azure Devops as a CI/CD server and ‘gate pipelines’ were setup to run Terraform plan on each PR. The developers could see during code reviews if there were any changes to the infrastructure. A separate release pipeline was setup as well, so that the ‘apply’ command did not run without an authorized dev explicitly running the pipeline. The staging and production environments were separated as well, adding an extra layer of security.