
E2E w/ Playwright - getting started
TL;DR - Setting up Playwright and writing initial tests were straightforward, except for some problems along the way
Welcome to another two-part series on testing! In this first start we our feet wet with E2E testing using Playwright and in the next post we'll deep-dive into screenshot testing.
The testing pyramid
Before we dive into setup, code and lessons learned. Let’s briefly level the playing field here. What’s E2E and how does it differ from integration or unit testing?
-
Unit testing takes small components of your code and verifies the behaviour in an isolated environment. For example, testing that a math add function doesn’t crash when given a string, or rendering a dropdown component.
-
Integration testing takes a group of these small components and uses them together to see that they behave and communicate as expected.
-
E2E testing tests your app from the user to the server ends, end to end. In our case, that means spinning up a browser, navigating to our app, logging in, picking a database schema, picking table columns and verifying that it all works as intended.
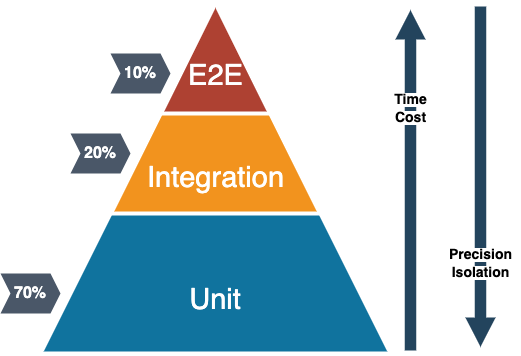
The above is a famous model of these testing types representing how much should be of which type. Typically E2E is slower and require more computing power, making them more expensive. They should test the most common and crucial end-user journeys and make up about 10% of your whole testing suite as per the testing pyramid. As a comparison, our CI server runs just one E2E test slower (~4 mins) than it runs all our unit and integration tests (~3 mins).
Playwright
The goal with any E2E test is for it to be as similar to the end-user experience as possible.
Playwright is a tool for E2E testing with any platform or browser. It’s built by Microsoft and is slowly gaining in popularity. Before this project I had only dabbled with Cypress a bit which is IMO more popular but slower. No science was involved in that statement!
global-setup.ts playwright.config.ts
Problem #1 - config not working for some settings
Some configuration did not activate for some reason, no amount of debugging or googling could help me. E.g.
- I could configure which browsers to run the tests on, but I couldn't set the
viewportfor them. - Increasing the screenshot
thresholddid not change the threshold used for comparing images. - Increasing test case
timeoutdidn't affect anything either.
The most common "solution" out there is to make sure to use the page argument for your tests:
Writing the tests
Our app had one main user flow where each step depended on the previous. Due to this, we chose to write one long-running test, instead of writing several that do the same thing. Playwright will let us know we're terrible humans since we haven't divided our test into smaller parts, but we know we're right ¯_(ツ)_/¯
The majority of Playwright commands are await-able, and you don't have to worry on placing try-catch all over the place. If any test command fails, an error will be thrown and the test runner will stop with some helpful error messages and a test report. Just read the error and navigate to your file, from there it's happy debugging ^^ It might look a bit like this:
Test commands
We use page locators to try and find our DOM elements.
Locators are the central piece of Playwright's auto-waiting and retry-ability. In a nutshell, locators represent a way to find element(s) on the page at any moment.
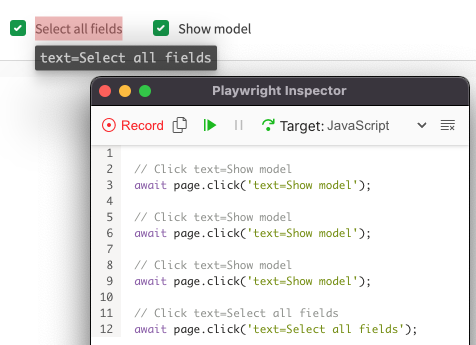
Note the importance of accessing the element type and what it should contain, rather than using test-ids. The aim is for the test to be as similar as possible as a human clicking around. A human does not have access to test-ids. But MTJody, I don’t have time to write these specific selectors! Well Playwright has got you covered! There is a tool called Playwright inspector which has built in code generation. You simply start your test in headed mode with an added pause block like the below...
...leads to this little popup. When you click record, hovering the UI will mark the elements much like devtools. Interacting with the UI will then create the commands seen in the screenshot below.
Problem #2 - locators not working
Sometimes these locators don’t work, and you might get frustrated. Congrats, now you know how a person in need of accessibility features will feel when using your app. Playwright actually helped us increase the accessibility by adding e.g. alt-tags
Helpful locators
So far we have seen page.locator but there are a lot of other helpful commands as well. You can use nested locators:
Find out what is displayed or hidden:
Finally interacting with elements:
Problem #3 - assertions not working when chained
Sometimes the test seems a bit too eager to resolve a toBeVisible. If you look at the code, the commands are chainable. But then they don’t pass for some unknown reason. My guess is it has to do with the timing of the event loop and DOM updates, I solved it by separating the assertion commands and extracting the locators to consts, reasoning being that it may give the event loop some time to clear out the queue. If you have a better guess or correct understanding, please let me know!
Next post
We'll look into how to use Screenshots both locally and in CI using Docker and all other kinds of magic!